
Differential Housing Repair
Contributed by: RepairEngineering

The purpose of this project was to repair the stripped-out threaded holes used to retain the access cover plate of a Caterpillar differential housing.
Differential Housing Repair Project Overview

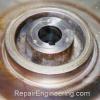
As shown in this detail view, one challenge that made this particular repair difficult to accomplish was the close proximity of the threaded holes to the pilot counterbore in the housing.
Obviously, the repaired housing also needed to be able to retain gear lubricating oil, without leaking, once assembled.
Workpiece Preparation

Each of the original damaged holes were drilled, countersunk, and tapped to accept a thread insert.
Note that the oversized tapped holes broke into the counterbore pilot surface, as shown here.
Thread Insert Repair Process

A new Keensert thread insert was threaded into each of the newly-tapped holes.
In a typical Kennsert installation process, the top of the insert is slightly recessed below the top surface of the workpiece.
In this application, however, the tops of the inserts were installed flush with the surface of the flange to help minimize the possibility of oil leakage at those locations.
Also, to help prevent oil leakage, each the inserts were installed using Loctite threadlocker compound.
Note that, when installed, one of the four locking keys of each insert happened to be located in the area of the differential housing pilot counterbore.
Locking-key Installation

In this step, the Keensert locking keys were driven-in to lock the insert into the housing.
As shown in this view, the locking key that was located in the area of the counterbore was removed, and not used.
Thread Insert Modification Process

Once all of the Keenserts were installed, the differential housing pilot was machined to remove the portions of the inserts that extended into the counterbore, as shown here.
As a last step, a two-part epoxy repair compound was used to fill the slot in each of the Keenserts where the locking key was removed - to help prevent the possibility of oil leakage around the insert at that location.
Completed Repair

This is a photo of the actual completed differential housing repair project.

Copyright © RepairEngineering.com. All rights reserved.
Content and images may not be reproduced in any way without permission.