E-Z LOK Thread Repair Insert
How It Works
E-Z LOK is a solid-body-style insert used in thread repair applications, or to reinforce threaded holes in softer materials. Inserts are used in a variety of housing materials including steel, aluminum, cast iron, and magnesium.

- E-Z LOK is a threaded bushing insert that is machined from solid steel.
The external threads of the insert are a standard diameter and pitch to allow installation using standard tooling. No special drills or taps are required.
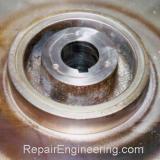
- Each insert is provided with two notches on one end as shown here. The notches are sometimes used to help install and remove the insert.
- Pre-applied thread locking compound on the external threads of the insert activates when the insert is installed in the housing. The adhesive begins to set-up immediately, and is fully cured in 72 hours.
Once cured, the insert is rated by its manufacturer to seal against pressures up to 6,000 psi.

Installation Instructions:

Installation Procedure:
- Drill out the old threads using the standard drill size. The recommended drill and tap sizes are printed on the E-Z LOK insert packaging.
- Tap the insert installation threads in the housing using the recommended standard tap size.
After drilling and tapping... clean the hole so that it is free of chips in preparation for installation of the insert.
- Install the insert.

Once installed, the top of the insert should be flush, or slightly recessed, below the top surface of the workpiece.
Several installation options are available...
- A simple installation tool is quickly made by using a bolt and jam nut assembly.
- For smaller diameter inserts, a screwdriver is used to engage the notches of the insert to drive it into the housing.
- E-Z LOK sells an optional installation tool that is helpful to help reduce time if several inserts need to be installed.

Questions and Answers: What is the process to remove an E-Z LOK insert? The following process is recommended...

- Heat the insert
The thread locking adhesive that retains the thread insert will begin to break-down at a temperature of 400 degrees Fahrenheit (204 C).
An oxy-acetylene torch can be used to heat the inner wall of the insert as shown here.
Once the insert is heated to the correct temperature, allow it to cool prior to attempting to unthread it from the housing.
- Remove the insert
After the insert cools, it is usually possible to unthread it from the housing by using an Easy-Out tool.
- If the old insert does not unscrew readily when using the Easy-Out tool...
An alternate approach is to drill through the remaining EZ-LOK insert using the same size drill used to create the insert installation threads.
After drilling, the remaining portion of the insert is removed by picking-out the insert thread... and uncoiling it from the workpiece.
The intent with using a using an oxy-acetylene torch is to localize the heat by directing it at the inner surface of the thread insert.
By working quickly, it is possible to concentrate most of the heat in the insert itself without much heat transfer to the surrounding housing.

Note:
While Easy-Outs are useful tools, they do need to be used with caution and judgement.
Easy-Outs are very brittle, and can shatter without warning. It can be very difficult to remove a broken Easy-Out from a workpiece.
Rather than forcing the tool, it is better to try another removal method if the old insert does not unthread easily from the housing when using the Easy-Out.

Return to E-Z LOK Top
Impeller
Repair Project
 Impeller Repair
Related
Articles


Copyright © RepairEngineering.com. All rights reserved.
Content and images may not be reproduced in any way without permission.